Showing posts with label Windows. Show all posts

Friday, August 2, 2024

Nearby Share for PC Download (Windows 11/10)

August 02, 2024 0

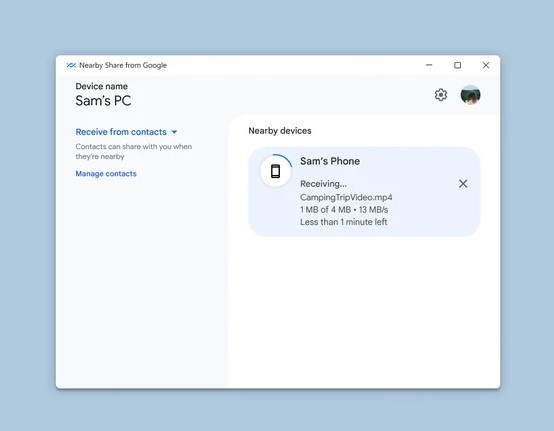
 A few days ago, Google accounted that Nearby Share for PC is not available to all users globally. For those who are unaware of Nearby Share, it’s an app that makes file sharing between devices easier.

Previously, the feature was only limited to Android and allowed users to send and receive files & apps across Android smartphones. However, a Nearby Share desktop app has been made, allowing users to send and receive photos, documents, and more between nearby Android devices and Windows PCs.

Due to its features and ease of use, many users have messaged us asking how to download Nearby Share for PC. So, in this article, we will discuss Nearby Share for PC download and how to use it. Let’s get started.
What is Nearby Share?

What is Nearby Share?

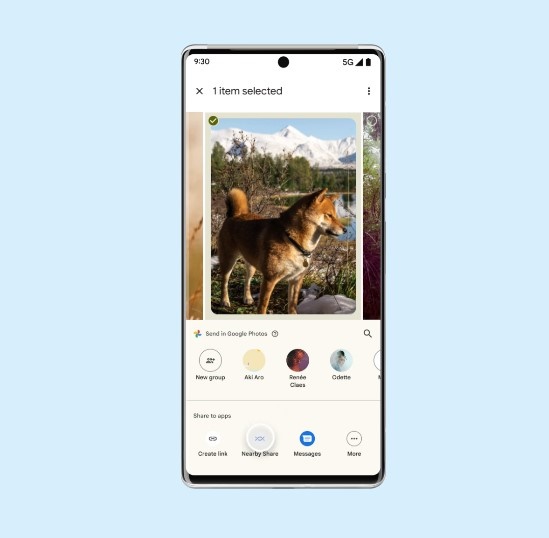
Nearby Share is basically a file-sharing feature seen on Android. Though originally developed for Android, Nearby Share was now available for Windows desktop/laptop users too.

Nearby Share provides an easy way to share files across all your smartphones, tablets, Chromebooks, and other devices.

If you wonder how Nearby Share shares files between devices, it uses your Bluetooth or WiFi connection to find devices ready to accept the files. Once it finds the devices, it connects and continues the file transfer process.

What Windows Computers are compatible with Nearby Share?

Before installing the Nearby Share desktop app, you must ensure your PC is compatible with the new app.

The new Nearby Share desktop app is compatible with PC/laptops running on the 64-bit version of Windows 10/11. The ARM device supports have been ruled out. Also, you need to ensure that your laptop/PC has a working WiFi and Bluetooth device.
Download Nearby Share for PC Latest Version

Download Nearby Share for PC Latest Version

Until this year, Nearby Share is only limited to Android devices. However, in March 2023, Google planned to develop the app further and introduced the beta version of Nearby Share for Windows.

The beta version of Nearby Share for Windows was made available in March 2023, and now it is officially released and available as an app for all users worldwide.

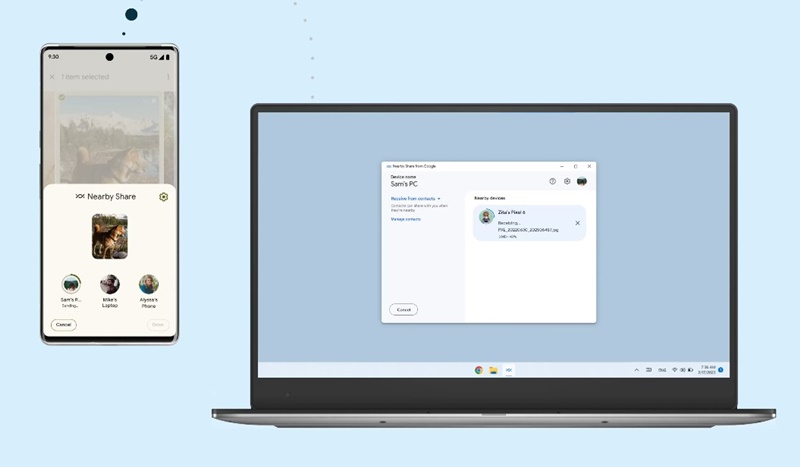
So, now you can go ahead and download Nearby Share for PC. If you have a compatible PC, you can download & install Nearby Share and transfer files across mobile and PC.

  • Download Nearby Share App for PC

How to Use Nearby Share on Windows?

How to Use Nearby Share on Windows


Using Nearby Share is very easy, provided you have a WiFi/Bluetooth-enabled computer along with the correct version of Windows.

To get started, you need to download & install the Nearby Share desktop app; you just need to open it and sign into your Google Account.

After signing in, set your Device visibility preferences to choose who can share with you. After setting up everything, you can send and receive files effortlessly across your Android and Windows PC.

Features of Nearby Share for Desktop

The new Nearby Share desktop app provides many useful features you may be interested in. Below, we have listed some of the best features of Nearby Share for PC.
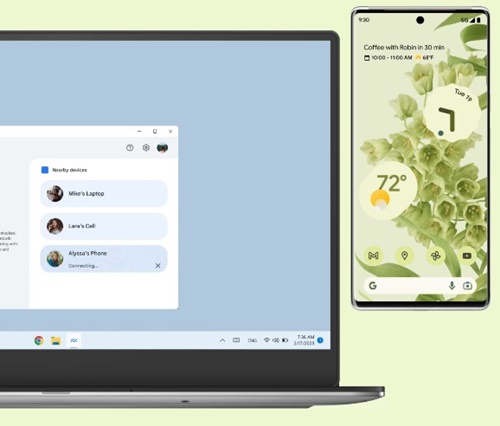
Features of Nearby Share for Desktop

Transfer Files Quickly

With the new Nearby Share for Desktop, you can easily & quickly transfer your important files across Android and Windows PC. The file-sharing speed is fast and without any limitations. You can share unlimited files with this app.

Send All Types of Files

Yes, you are not limited to documents; you can now share photos, videos, audio files, or entire folders between your Android device and Windows desktops and laptops with Nearby Share.

Share how you want

The new Nearby Share desktop app allows you to control how you share files. You get control over who can discover your device and send files with you. You can set this control to receive files from everyone or your friends/family.

View Pictures on Bigger Screen

Since the Nearby Share desktop app supports sharing photos from Android to Windows, one benefit is viewing the pictures on a bigger screen. You can just share the picture you wish to view on your PC on a bigger screen.

Completely Free

Yes, you read that right! You get all these features without spending anything. Nearby Share is completely free to download and use on a desktop. What’s more interesting is that the tool doesn’t restrict the number of files you can send.

Frequently Asked Questions

Is Nearby Share for PC free?

Yes, the new Nearby Share app for PC is completely free to download and use. Also, you won’t have to purchase anything to share files between the devices wirelessly.

How do I connect my Android device to Nearby Share for Windows?

If your phone runs on Android 6 or above, Nearby Share is already installed. So you don’t need to download an additional app on your phone. On the desktop, download & install the Nearby Share app and enable the device visibility.

How do I turn on Nearby Share on my Android device?

Enabling Nearby Share on an Android device is very easy. Just pull down the notification shutter and tap on the Nearby Share tile. This should enable the feature on your phone.

How close should my devices be to use Nearby Share?

To exchange files wirelessly with the Nearby Share feature, your devices should be close to each other, within 16 feet (5m).

Is Nearby Share Secure?

Yes, the new Nearby Share for desktops is 100% secure and safe to download and use. However, what files you receive from others may be questionable regarding security. So, double-check the files before accepting them from others.

Nearby Share is an excellent tool since it reduces our efforts for sharing files across devices. The file-sharing tool supports all sorts of file types for transferring. So, use the Nearby Share app on your desktop to receive & send files wirelessly.

How to Install Missing Drivers on Windows 11 (4 Methods)

August 02, 2024 0

 If you have been using Windows 11 for a while, you may know that the operating system automatically detects & installs most drivers during system updates. Also, you can manage the device drivers from the Device Manager.

While Windows 11’s functionality is very helpful, sometimes the update process gets stuck, resulting in missing drivers. If you have just connected a new device to your computer or laptop and Windows 11 has failed to recognize it, it won’t install the required drivers for the proper functioning of the connected devices.

If so, you must manually find and install the missing drivers on Windows 11. We have mentioned four different ways to do this.

1. Download & Install Missing Drivers via Windows Updates

One of the easiest ways to install missing drivers on Windows 11 is by utilizing the Windows Update. Follow some simple steps we have shared below to download & install missing drivers on Windows 11 from the Windows Update.

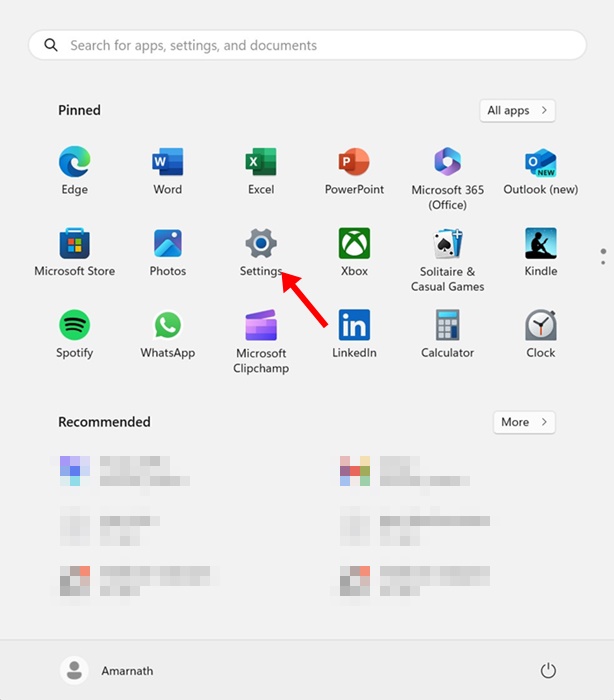
1. Click on the Windows 11 Start button and select Settings.

Settings

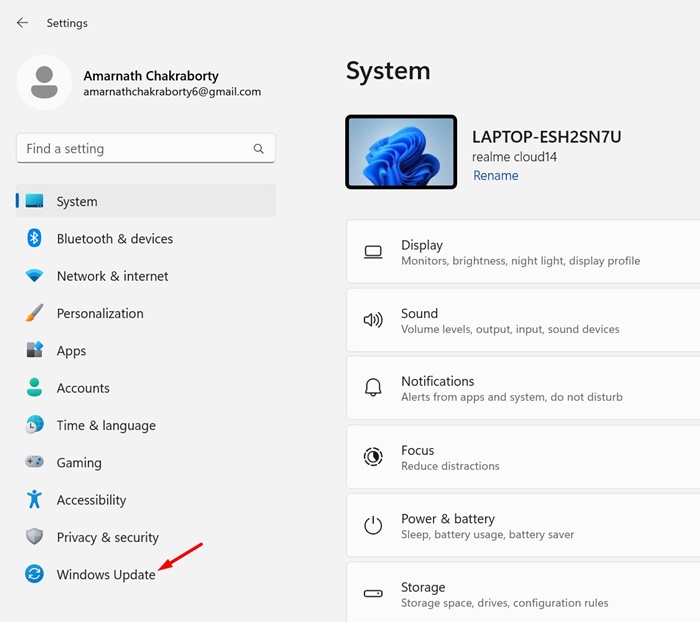
2. When the Settings app opens, switch to the Windows Update tab on the left pane.

Windows Update

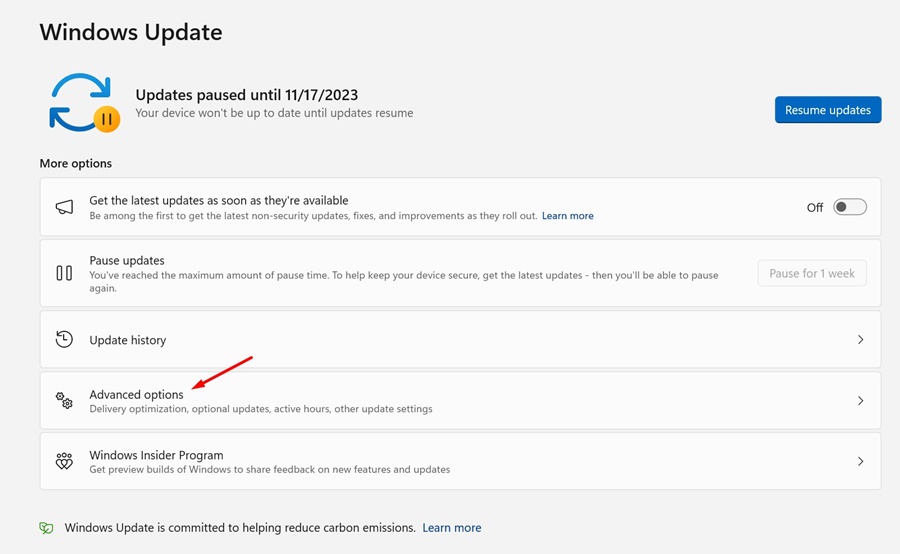
3. On the right side, click on the Advanced Options.

Optional Updates

4. Scroll down to the Additional options and click on Optional Updates.

Advanced Options

5. If a driver update is available, the update will appear under the Driver Updates.

6. Click the Download & install button to install the missing driver.

2. Install Missing Drivers on Windows 11 via Device Manager

As we know, Device Manager is the ultimate solution for all device driver needs. From the Device Manager, you can easily install/uninstall existing drivers, roll back drivers to the previous version, or uninstall a device.

The Device Manager of Windows 11 can also install the missing drivers. To do that, follow the steps we have shared below.

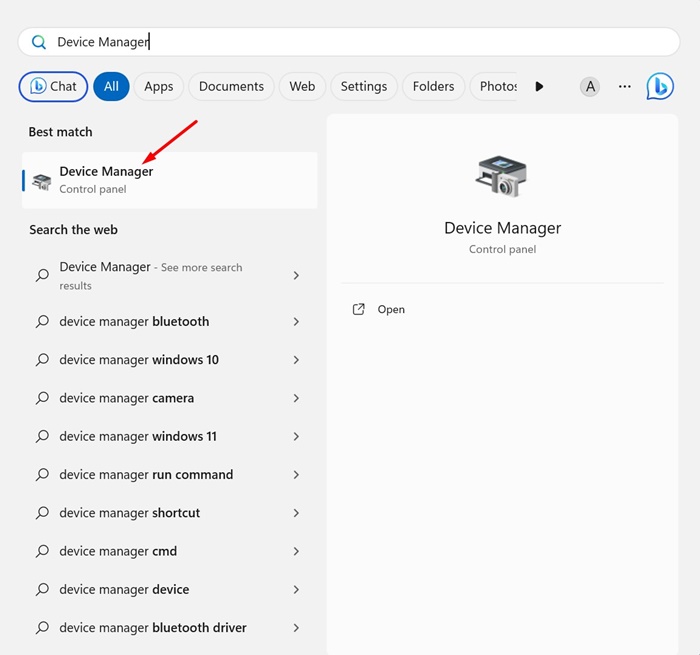
1. Type in Device Manager on the Windows 11 search. Next, open the Device Manager app from the list of best match results.

Device Manager

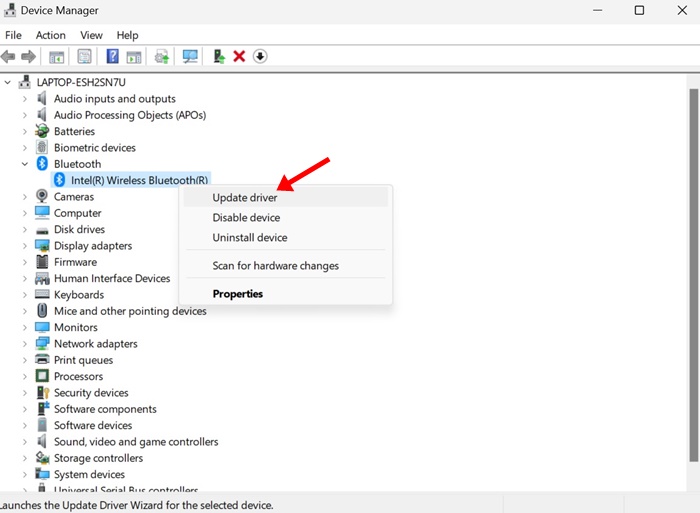
2. When the Device Manager opens, right-click on the device whose driver is missing.

right-click on the device

3. On the context menu, select the Update driver option.

Update driver

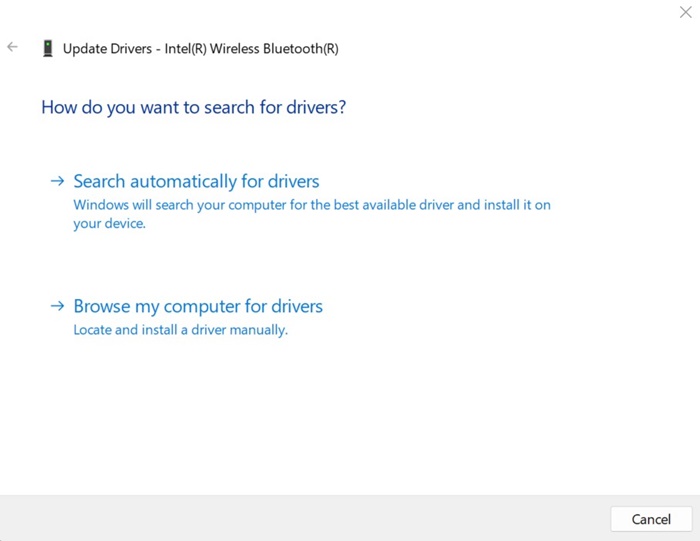
4. On the How do you want to search for drivers? Prompt, select Search automatically for drivers. If you already have the missing driver, select the Browse My Computer for drivers option.

Search automatically for drivers

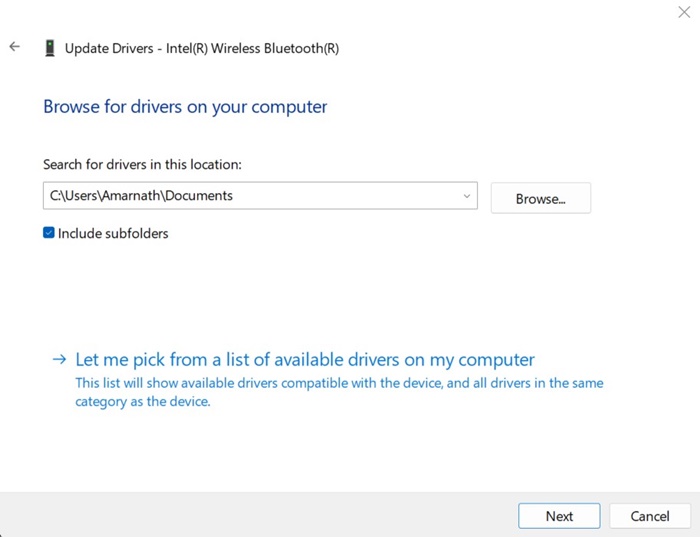
5. If you have selected the second option, you will be asked to select the drive containing the missing driver. Locate the folder and click on Next.

locate the folder

6. Follow the on-screen instructions to install the missing device driver on Windows 11.

3. Download Missing Drivers from the Official Website

Let’s say, you just installed a new sound device on your PC, but it’s not working due to missing drivers.

The best way to eliminate such problems is to install the missing drivers from the website of your sound device manufacturer.

Similarly, if you want to install the missing GPU driver, you can visit your GPU manufacturer’s website and download the latest version of the available driver.

All you need to do is identify the make and model of the specific hardware for which you need drivers and search for it on Google. Then, open the official website and download the latest version of the drivers.

After downloading the drivers, you need to install them and restart your computer.

4. Use Third Party Driver Updater Tools

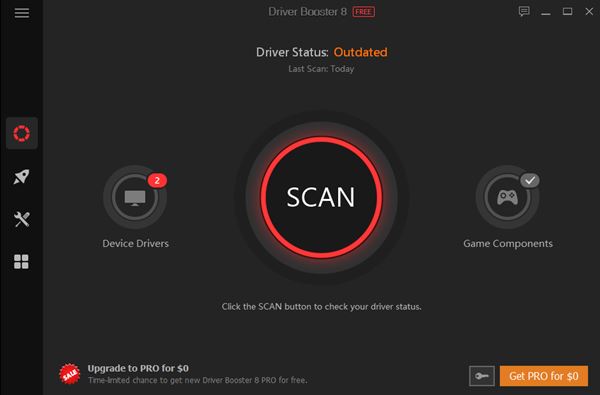
Third-party driver updaters for Windows 11

The remaining option to install all missing drivers on Windows 11 is to use third-party driver updater tools. Driver updater tools compatible with Windows 10 runs fine on the latest Windows 11.

There are hundreds of driver updater tools for Windows available on the web. Almost all tools can be downloaded & used for free, but make sure to download the installer file from trusted sources.

On Techviral, we have already shared a list of best driver updaters for Windows. You can check out that list to discover all available options.

These are the best ways to install missing drivers on Windows 11. Using these three methods, you will be able to find and install all missing drivers that are crucial for your device’s proper functioning. If you know of any other method, let us know in the comments below.

How to Delete User Profile in Windows 11 (5 Methods)

August 02, 2024 0

 Like Windows 10, Windows 11 can create multiple local user accounts, allowing users to create a separate account for each user using the computer.

While creating a user profile is straightforward, what if you want to remove any existing user profile in Windows 11?

Deleting a user profile on Windows 11 doesn’t require installing third-party apps or using advanced tools like CMD/Powershell. To delete the existing user profile, use the Windows 11 Setting app, Control Panel, Registry Editor, or the User Account Wizard.

1. Delete User Profile via Settings App

In this method, we will use the Windows 11 Settings app to delete a user profile. Here are some of the simple steps you need to follow.

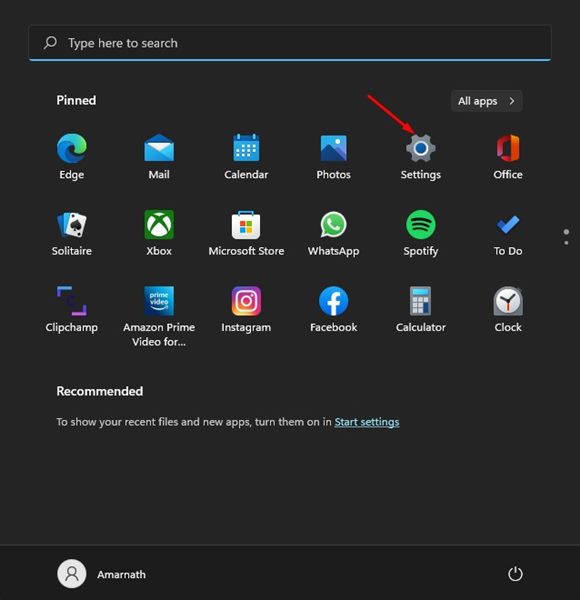
1. First, click the Windows 11 Start button and select Settings.

Settings

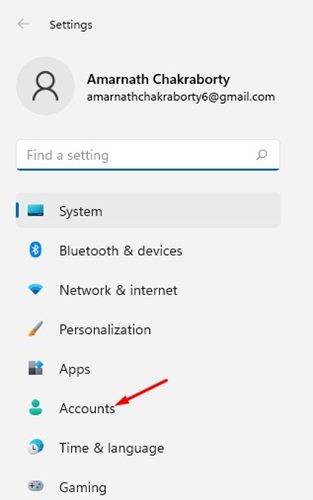
2. On the Settings app, click on the Accounts option located on the left pane.

Accounts

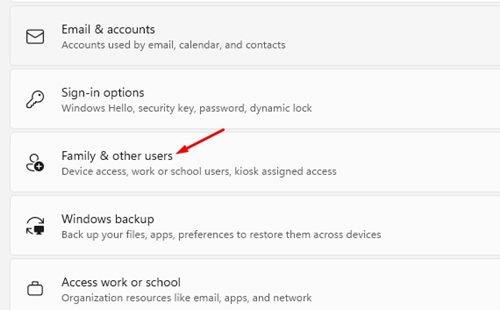
3. On the right pane, click on the ‘Family & other users’ option.

Family & other users

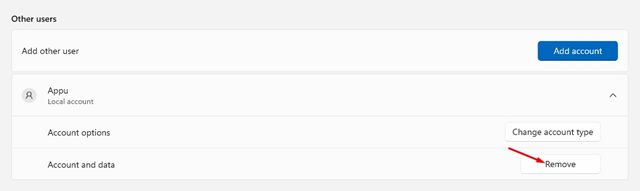
4. On the Other user’s section, click on the user profile name to expand the section.

5. Once expanded, click on the Remove button.

click on the Remove button

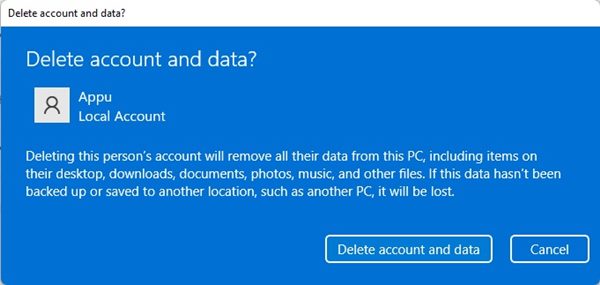
6. On the confirmation prompt, click the Delete account and data option.

click on the Delete account

2. Deleting a User Profile via Control Panel

We will use the Windows 11 Control Panel to delete a user profile in this method. Here are some of the simple steps you need to follow.

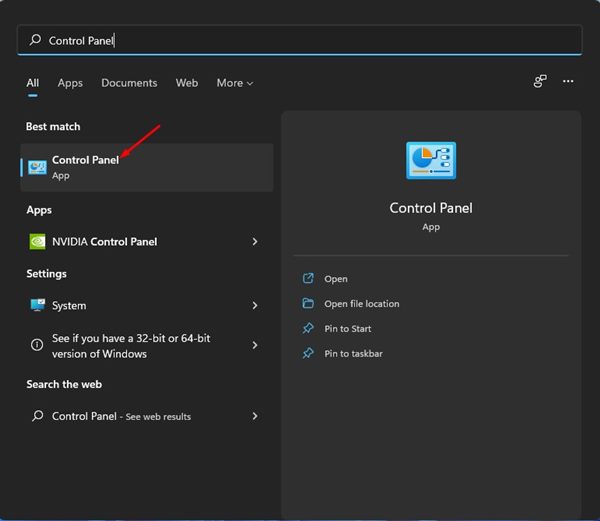
1. First, click on the Windows 11 Search and type in Control Panel.

Control Panel

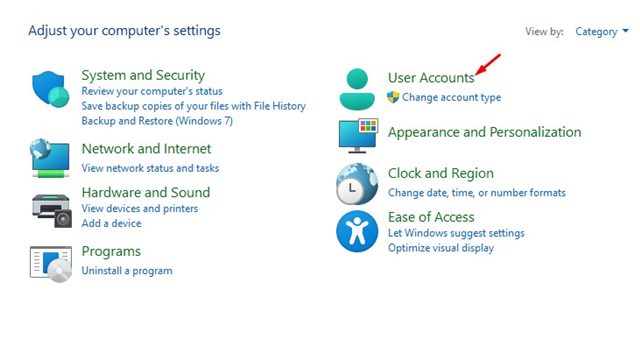
2. On the control panel, click on the User Accounts option.

User Accounts

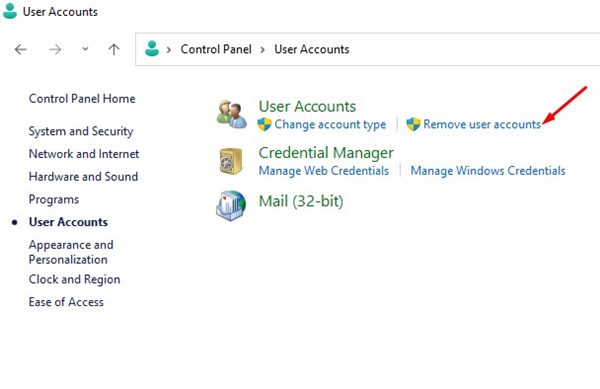
3. Click the Remove user accounts link on the next page.

Remove user accounts

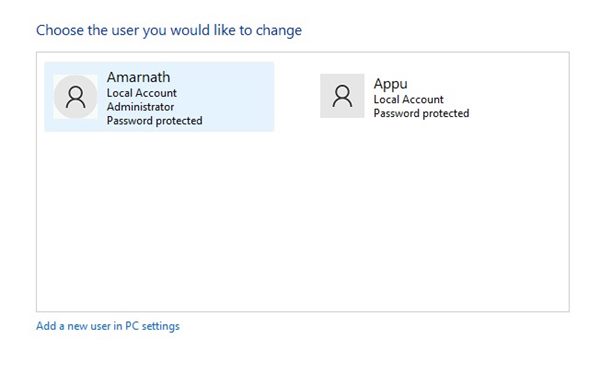
4. Now, you need to select the account that you want to delete.

select the account

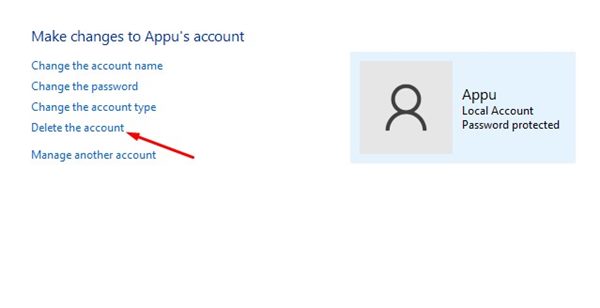
5. On the next screen, click the Delete the account link.

click on the Delete the account

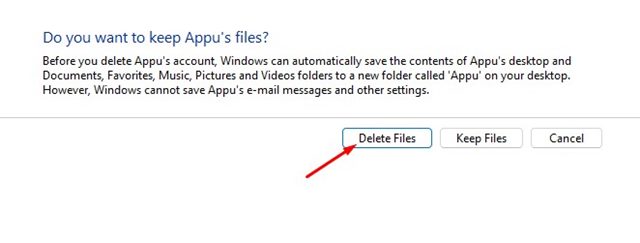
6. Now, you will be asked whether you want to keep the files saved by the user. Click on the Delete Files button if you don’t want the files.

Delete files

3. Delete a User Profile via User Accounts Wizard

User Account profiles can be used to delete user profiles in bulk. This one is easier compared to the previous two methods. However, this option is not available on every Windows 11 build. Here are some of the simple steps you need to follow.

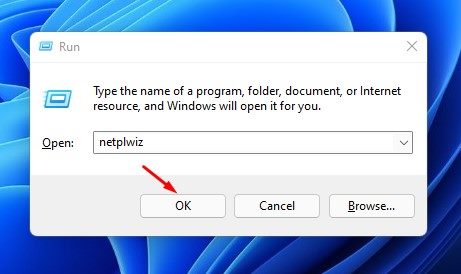
1. Press the Windows Key + R button to open the RUN dialog box. On the RUN dialog box, enter netplwiz and hit the Enter button.

enter netplwiz

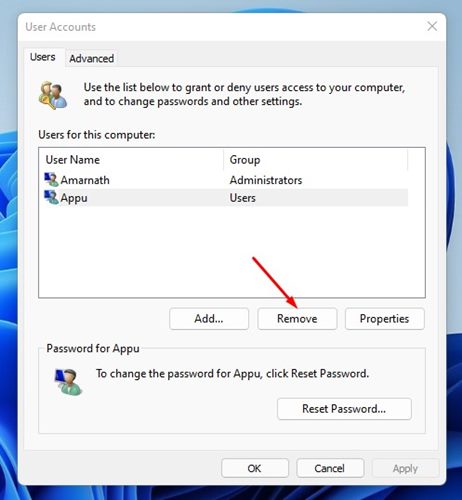
2. On the User Accounts wizard, click the Users tab and select the account you want to remove.

3. Now click the Remove button, as shown in the screenshot below.

click on the Remove button

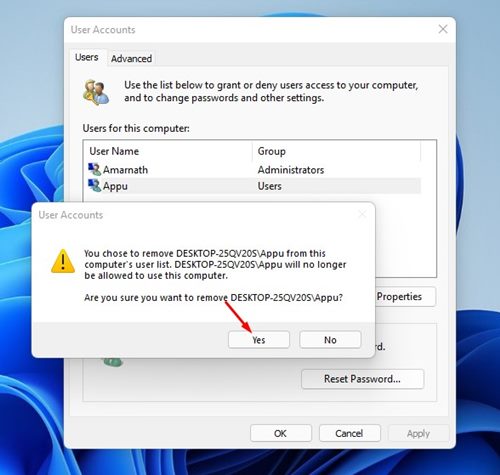
4. On the confirmation prompt, click on the Yes button.

click on the Yes button

4. Delete User Profile from Advanced System Properties

The Advanced System Properties of Windows 11 lets you manage your user profiles. You can also use it to delete a user profile on Windows 11. Here’s what you need to do.

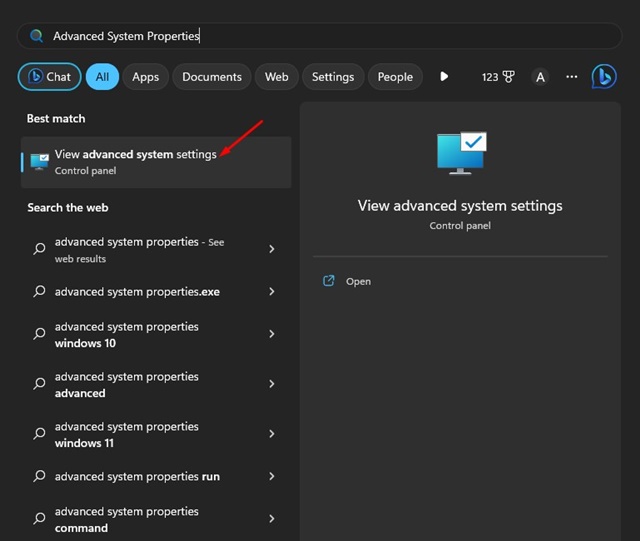
1. Click on Windows 11 search and type Advanced System Properties.

2. Select View Advanced System Settings from the list of available results.

View Advanced System Settings

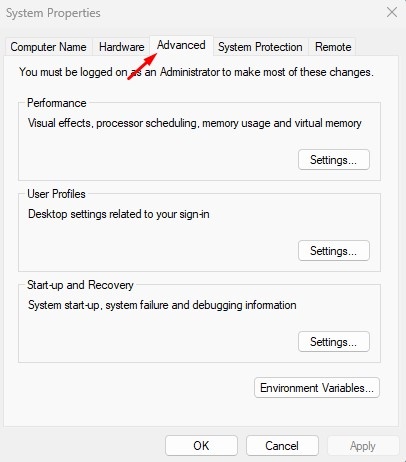
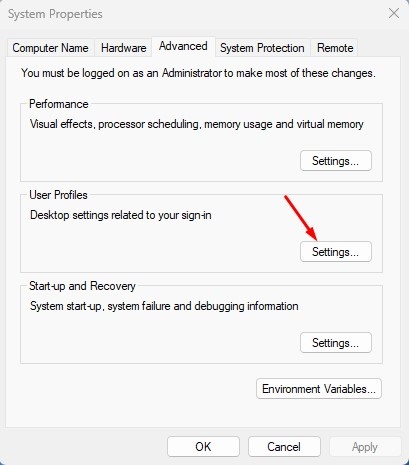
3. This will open the System Properties. Switch to the Advanced tab.

Advanced

4. On the Advanced, click the Settings button under the User Profiles.

Settings

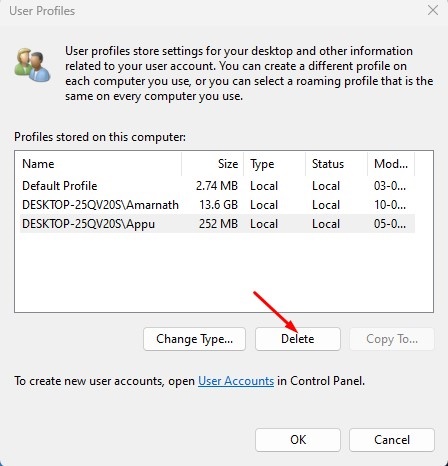
5. On the User Profiles, select the profile you want to delete and click the Delete button.

Delete

If the Delete option is grayed out, the user account is currently in use and logged in. Switch to a different user account and delete it.

5. Delete User Profile Using the Registry Editor

You can also use the Registry Editor to delete a user profile. The steps to delete a user profile using the Registry are a bit complicated; hence, follow them carefully.

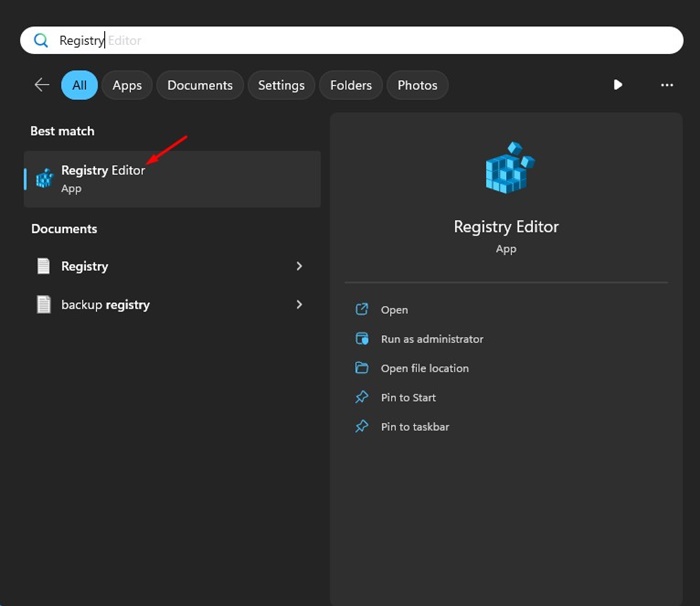
1. Type in Registry on the Windows Search. Next, open the Registry Editor from the list of best match results.

Registry Editor

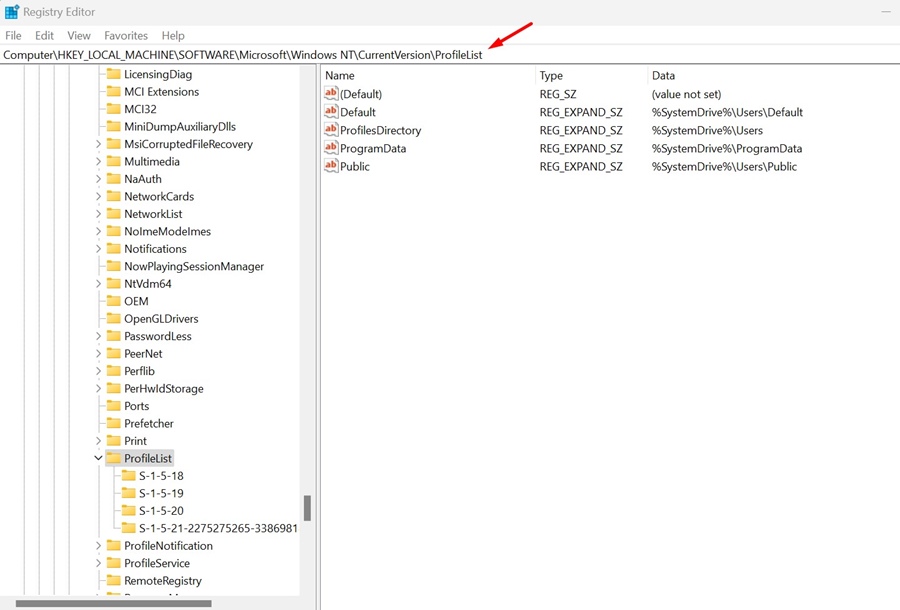
2. When the Registry Editor opens, navigate to this path:

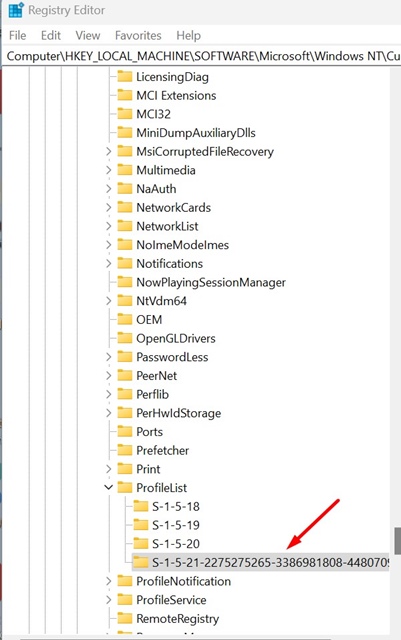
HKEY_LOCAL_MACHINE\SOFTWARE\Microsoft\Windows NT\CurrentVersion\ProfileList

navigate to this path

3. Next, expand the ProfileList folder. You will find many subfolders; select the last one.

select the last one

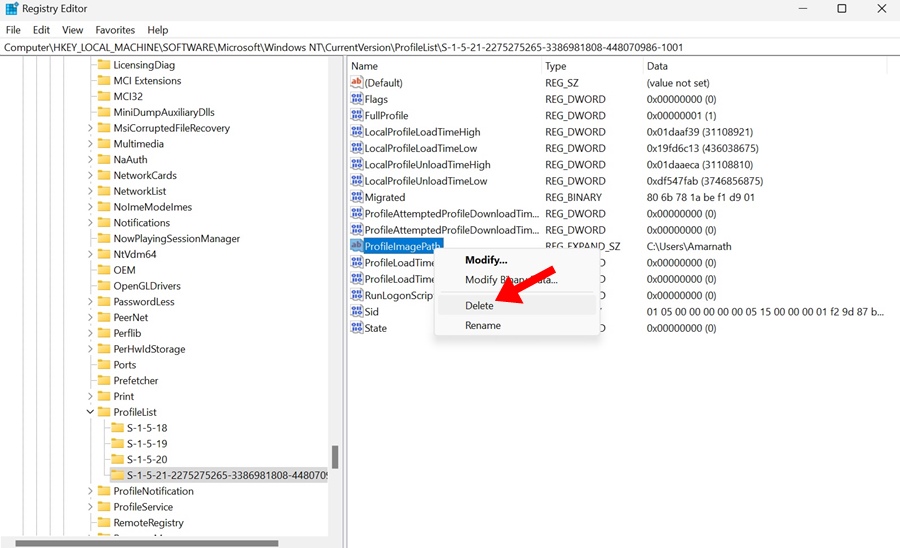
4. On the right side, find and right click the ProfileImagePath key directing to the profile name you want to delete. On the context menu, select Delete.

Delete

5. On the Delete confirmation prompt, click Yes.

Creating and deleting a user profile in Windows 11 is pretty straightforward. You can rely on any of these four methods to delete existing user profiles in the operating system. I hope this article helped you! Please share it with your friends. If you have any doubts, let us know in the comment box below.